Cover a Screen Door With Fabric for Garden Art
Sun Screen Fabric is an fantabulous choice for your garden fabric needs. It is available in an array of colors including black, greenish, harvest red, chocolate, and saddle tan.
For the easiest installation of Jobe'due south Sun Screen Fabric, select the piece of cake-to-utilize accessory best suited to your application. Choose from Locking Clips, Locking Ties, Snap Grommets, and Forest Fasteners – all designed to make Sun Screen Fabric projects simple to practise so you lot can enjoy the results sooner.
Whether you lot're a professional person gardener or a hobbyist, Jobe's Sun Screen Fabric is a nifty production that tin can help you lot take your gardening to the next level. Garden textile is versatile and can exist used for a diverseness of projects. Want to make the most out of garden fabric? Have a wait at these five DIY projects, all of which characteristic uses for Sun Screen Fabric.
Greenhouse
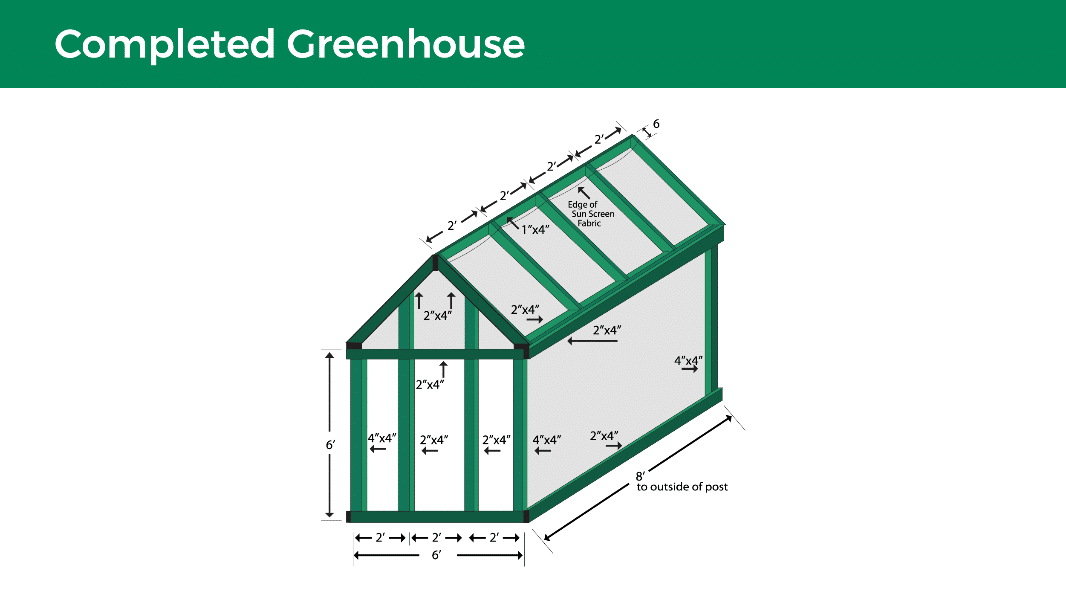
Greenhouses aren't merely something that you find in professional gardens. This 6' x eight' greenhouse is easily constructed and can be put in your backyard to expand your gardening possibilities. In addition, the materials listed for this project can exist modified if you desire to build a smaller or larger greenhouse. We do recommend pressure-treated lumber for this projection.
Tools and Materials
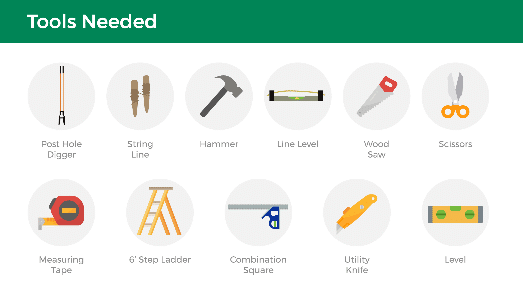
Hither's what yous'll need: post hole digger, string line, hammer, line level, wood saw, scissors, measuring tape, step ladder, combination square, utility knife, and a level.
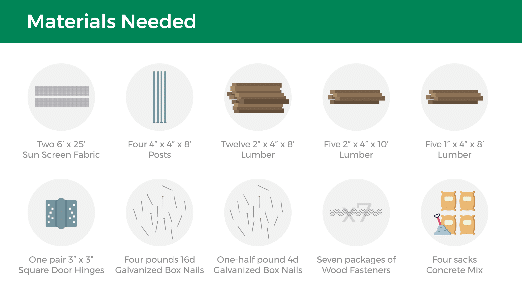
Here'southward what you'll need: sun screen cloth, posts, lumber, square door hinges, galvanized box nails, wood fasteners, and concrete mix.
Instructions
- Set iv corner posts 2′ deep in concrete, align, and plumb.
- With string and line level, marking tops of posts level and cut off.
- Cutting and nail a 2″ x 4″ band effectually the outside of the posts flush with the post tops. Do the same at ground level.
- Boom a ii″ x 4″ x 8′ rafter plate on top of the posts and flush with the exterior of the band on the two 8′ sides.
- Nail two 2″ 10 iv″ 10 8′ to the inside of the acme and bottom bands to form a ii′ door opening in the middle of one of the half-dozen′ ends.
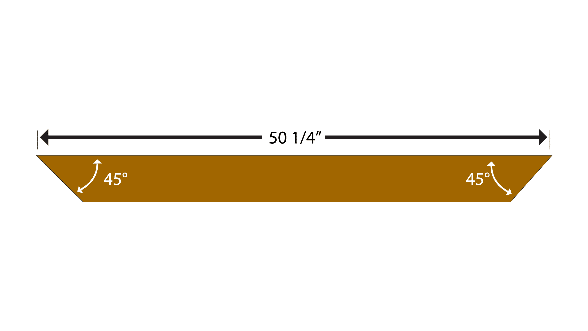
- Cut x rafters, 50 1/four″ long at the longest point with a 45° angle on each terminate.
- Use a 1″ x iv″ x eight′ as a ridge and install the rafters in pairs, i pair every 2′. The pair over the door should smash to the studs on either side of the door.
- Starting at the door opening, wrap the inside of the walls with Sun Screen Material, fastening it to the acme 2″ 10 iv″ band with Woods Fasteners. And so fasten to bottom ring, corner posts and studs at door.
- Cut two 6′ x 8′ pieces of Sun Screen Fabric for the roof. Lay ane piece half dozen″ past the ridge. Fasten to the rafters on the contrary side. Stretch down and fasten with Woods Fasteners to ridge, rafters, and rafter plate. Repeat on the other side. Trim off backlog textile along rafter plate.
- Embrace gable ends with Sun Screen Fabric. Fasten with Woods Fasteners and trim off excess.
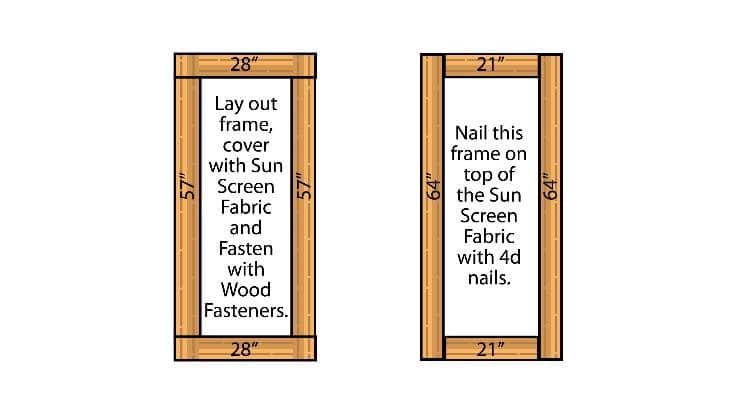
- Construct door from four 1″ ten four″ ten 8′ and 28″ ten 71″ piece of Sun Screen Cloth.
- Cut:
- Two 1″ x 4″ ten 28″
- 2 1″ x4″ 10 57"
- Two 1″ x4″ 10 21″
- Two 1″ x4″ x 64″
12. Center door opening and hang with 3′ x 3″ hinges.
Patio Shade
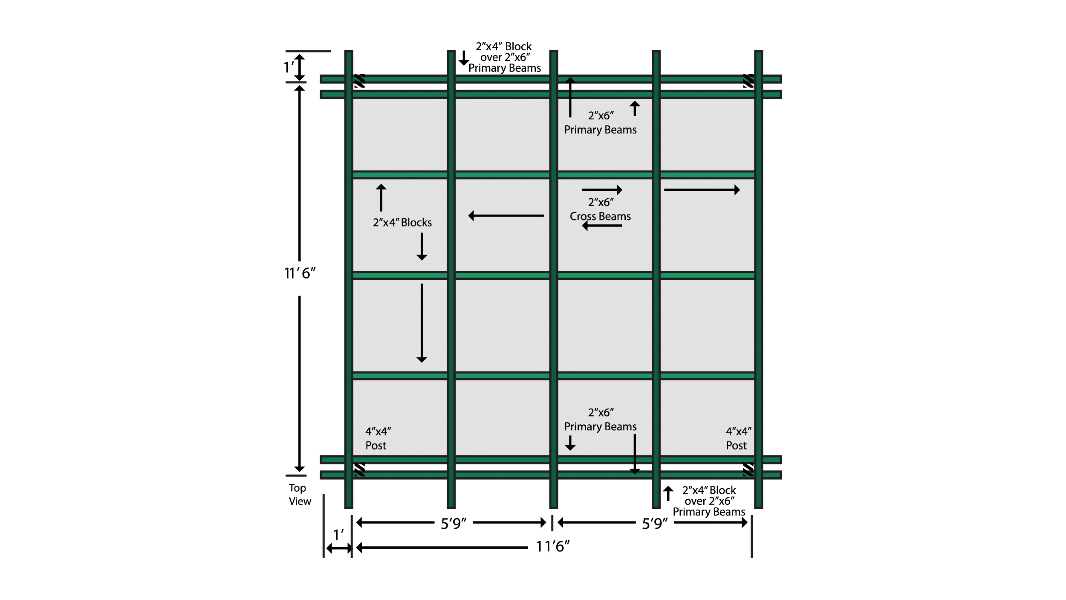
Patios are great places to spend time, but they tend to get hot in the summer. To gainsay that, endeavour constructing this useful and cool patio shade. This particular example is for a 12′ 10 12′ shade, simply you tin modify the cloth needs for other shade sizes. Lord's day Screen Fabric comes in 6′ widths. We recommend force per unit area-treated lumber.
Tools and Materials
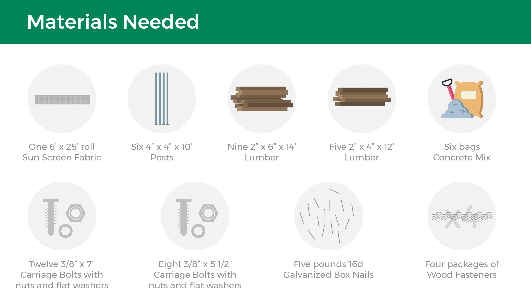
Here'south what you'll need: lord's day screen fabric, posts, lumber, concrete mix, bolts with nuts and flat washers, galvanized box nails, and wood fasteners.
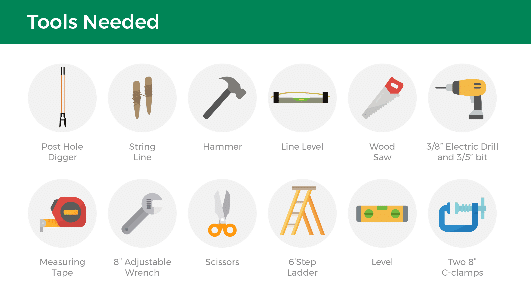
Here's what you'll need: post hole digger, string line, hammer, line level, wood saw, electric drill, measuring record adaptable wrench, pair of scissors, stride ladder, level, and c-clamps.
Instructions
- Set posts in concrete leaving 8′ above ground. Align and set plumb according to dimensions on the sketch.
- Employ string and line level to mark tops of posts. Cut four corner posts at the same level and the 2 middle posts 5 1/2″ shorter.
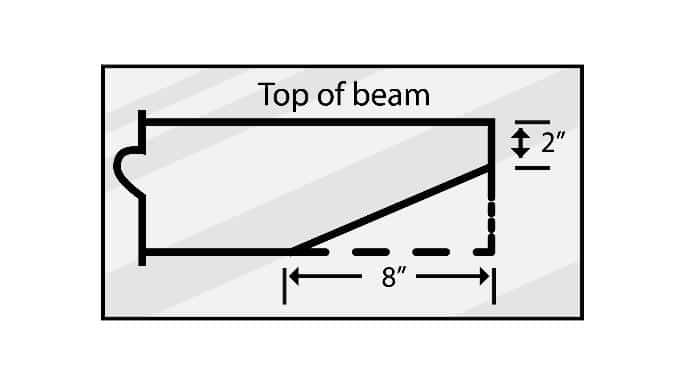
- Cutting all nine beams 13'6″ top of axle long. With the crown of the boards lined up, mark up and cut the bottom edge of both ends at an angle.
- Measure out down 11″ from the meridian of each of the four corner posts and marking a level line all around the mail.
- Install a 2″ x half-dozen″ primary beam above the lines on each side of the two sets of three posts. The acme of these beams should be 5 1/2″ down on the comer posts and affluent with the middle posts. The beams can be clamped to the posts and then through-bolted. One foot of the beam should extend by the corner posts.
- Install a cantankerous beam on each end of the construction and through bolt to the corner posts.
- Install the center axle over the 2 heart posts and toenail to them.
- Install 2 remaining cross beams. Center them in the remaining spaces.
- Cut and install 2″ x 4″ blocks betwixt cross beams flush with the beam tops. All five blocks between any two side by side beams should be the same lengths.
- Cutting ii 6′ x 12′ pieces of Sun Screen Fabric. Overlap them i 1/ii″ on the center cantankerous beam and spike with Woods Fasteners. Stretch toward exterior and fasten to all cross beams and blocks as you work across the frame. Trim excess fabric along the outside edges of the frame.
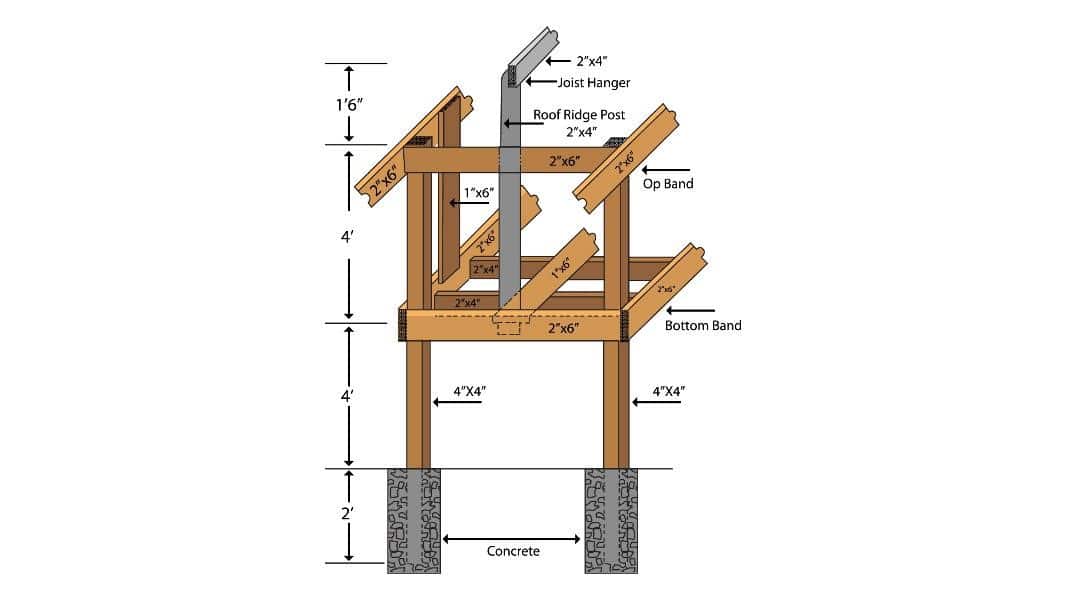
Playhouse and Sandbox
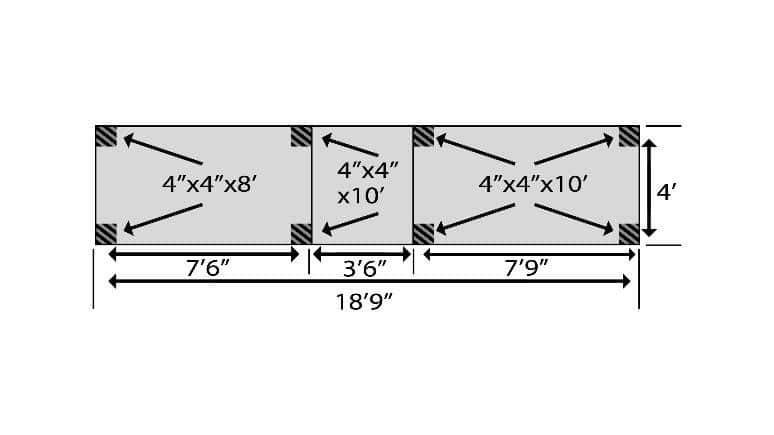
Adults aren't the only ones that can benefit from Jobe's Sun Screen Fabric – it'south beneficial to all ages! This playhouse and sandbox example is iv′ wide and 19′ long, and you tin modify these instructions to fit your specific needs. We recommend pressure-treated lumber. In improver, construction screws of appropriate lengths can be substituted for nails in the materials list.
Tools and Materials
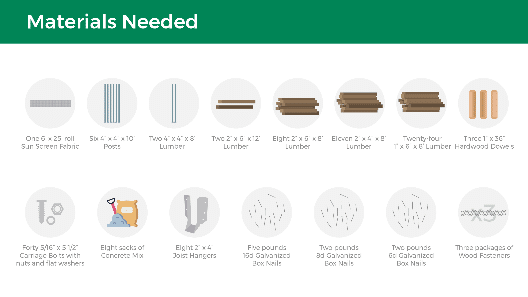
Here'southward what you lot'll need: sun screen fabric, posts, lumber, hardwood dowels, bolts with nuts and flat washers, concrete mix, joist hangers, box nails, and wood fasteners.
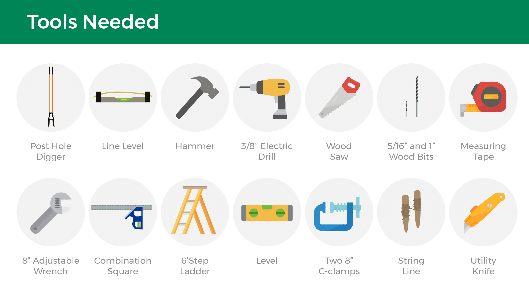
Here'southward what yous'll demand: post hole digger, line level, hammer, electrical drill, forest saw, wood bits, measuring tape, adjustable wrench, combination foursquare, step ladder, level, c-clamps, string line, and a utility pocketknife.
Instructions
- Prepare posts ii′ deep in concrete. Brand certain they are carefully aligned and plumb.
- Using string and line level, marker the tops of the vi tall posts level and cut them to the same height. Practise the same for the two shorter posts.
- Measure out down iv′ from the tops of the tall post and mark on the outside of the posts. Install a two″ x 6″ band around the outside of the posts in a higher place this line. Through-bolt the 2″ ten 6″ x eight' two bolts per mail service and nail the 2″ x 6″ x 4′ boards with 16d nails to the posts.
- Through-bolt a 2″ ten 6″ x 12′ to the exterior of the three tall posts affluent with their tops at 2 bolts per post. Repeat for the other three posts.
- Nail iii 2″ x 6″ x 4′ between the pairs of alpine posts at their tops with 16d nails to complete the band effectually the top.
- Cut two 2″ x 4″ x 8′ to 5'six″ for the roof ridge poles. Indicate the top ends by cutting the corners at 45° angles. Center on the two 4′ bands and spike with one pole at each finish of the playhouse
- Cut a two″ x iv″ x 8′ to fit betwixt the tops of the ridge poles and fasten to their tops with joist hangers.
- Construct a two″ x 4″ band around the outside of the tops of the 4 posts around the sandbox. The high end will exist below the 2″ x 6″ band and the lower end should be flush with or slightly higher up the tops of the two shorter posts. Smash with 16d nails.
- Construct a 2″ x 6″ band on the ground to class the sandbox. Through-bolt all four sides (two bolts at each cease of each board) to the exterior of the posts.
- Install five 2″ x 4″ x 4′ flooring joists for the playhouse floor. Nail the ii end joists to the posts, flush with the bottom of the two″ x 6″ band. Iii other joists should be evenly spaced betwixt these and fastened to the 2″ x vi″ band with joist hangers.
- Cut the 1″ x half-dozen″ x viii′ floor boards to length and nail with 8d nails to the floor joists. Leave approximately 1/2″ infinite between boards. Notch floor boards around posts and ridge poles.
- Decide where the ladder to the playhouse is to be located. Wall up the other areas from the inside with 1″ ten half dozen″ x iv′. Exit approximately two″ betwixt boards. Nail to the top and lesser band with 6d nails.
- Construct the ladder from two ii″ x 4″ 10 eight′ and half-dozen 16″ long 1″ dowels. I foot of the bottom of the ladder should be set up into the ground to prevent shifting. A 2″ x 4″ tin also be nailed between the bottom of the posts to stabilize the bottom of the ladder. From footing level on the rails, measure every 8" through 48" and marker the middle of the 3 1/2″ face of the runway at these points.
- Diameter 1″ holes for the rungs. Insert the rungs and secure by nailing through the 1 1/ii″ border of the rail into the terminate of the rung with 8d nails. Through-bolt the rails to the two″ x 6″ band at the floor height. Three feet of the rails should extend above the floor level.
- Cut a half-dozen′ x 8′ piece of Sun Screen Fabric to cover the playhouse roof. Center on the ridge and fasten to information technology with Wood Fasteners. Stretch down to each side and fasten to top 2″ x six″ band with Forest Fasteners. Trim off excess.
- Cutting a 6′ x ix′ slice of Sunday Screen Textile to cover the sandbox. Fasten to 2″ ten 4″ ring with Forest Fasteners. Trim off backlog.
- Cutting a 6′ x 4′ piece of Sun Screen Cloth to complete the middle roof. Fasten to 2″ x 6″ band with Wood Fasteners. Trim off excess.
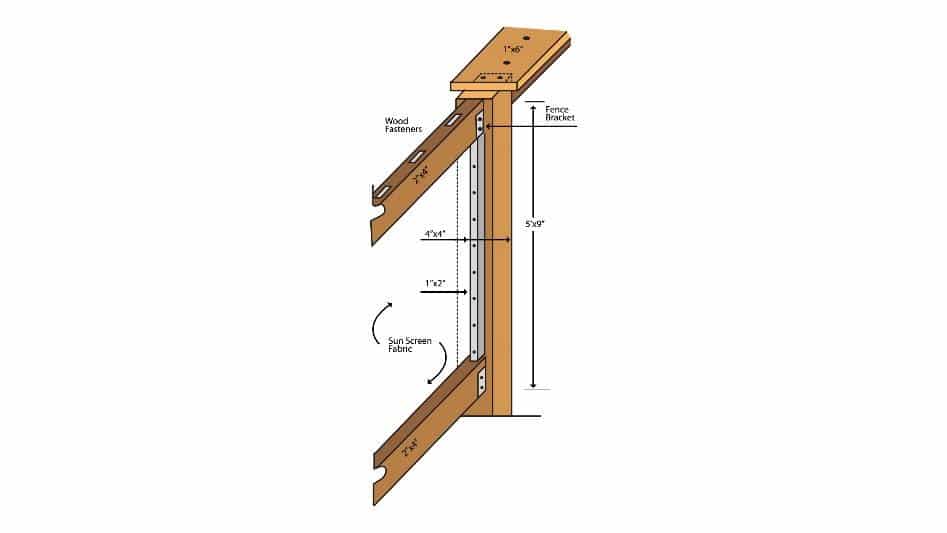
Privacy Debate
Sun Screen Fabric can assistance yous construct a privacy fence with significantly less lumber. If you demand a particularly big or small fence, you lot can modify the below instructions every bit needed. Follow this exact example for a 6′ loftier argue in eight′ long sections. Pressure-treated lumber is recommended.
Tools and Materials
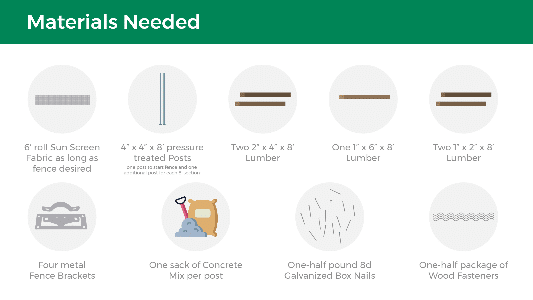
Here's what you'll demand: sun screen cloth, pressure level treated posts, lumber, metal argue brackets, concrete mix, galvanized box nails, and wood fasteners.

Hither's what you lot'll demand: mail hole digger, scissors, hammer, level, woods saw, utility knife, measuring tape, and a stride ladder.
Instructions
- Determine location of four″ x iv″ posts. Have no more than than 7′ 6″ between posts.
- Set posts 2′ deep in concrete. Make sure they are properly aligned, spaced, and plumbed.
- Cut a ii″ 10 4″ rails to fit between the tops of the first two posts and install flush with the tops of the posts using contend brackets.
- Measure down from the top of the posts 5′ 9″ and marking. Install fence brackets above these marks.
- Cutting a two″ 10 4″ rail to fit into these lower brackets but do not smash in place.
- Cut a length of Sun Screen Fabric iv″ longer than the distance between the posts (7'–10′ in our example).
- Spike one vii'–10′ side to the bottom edge of the bottom ii″ ten four″ rails using Wood Fasteners. The fabric should extend 2″ beyond the ends of the rails.
- Install the lesser 2″ x 4″ rail and blast in place.
- Stretch the Dominicus Screen Cloth up over the summit track and spike to the pinnacle border with Forest Fasteners.
- Cut a 1″ ten 6″ cap to extend to the center of the postal service. All splices should exist on peak of the posts. Blast to posts and peak rail.
- Cutting one″ ten 2″ furring strips betwixt the rails. Fold Sun Screen Fabric under 1″ x 2″ and boom to post.
- Trim off excess Sun Screen Fabric with utility knife.
- Repeat procedures for remaining sections.
Ringlet-Up Shade
Got a window that's peculiarly bright when the sun shines? This scroll-up shade projection is just for yous! This instance is for a 6′ x vi′ shade, but y'all volition need to modify the materials depending on the top and width of your exact windows.
Tools and Materials
Hither's what you'll demand: hammer, forest saw, measuring tape, screwdriver, and scissors.
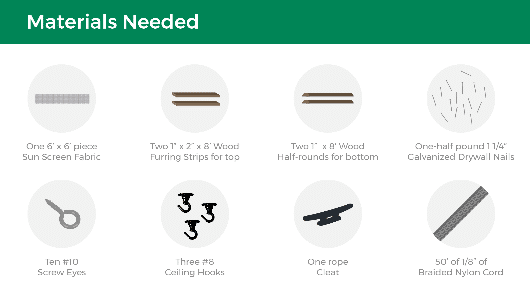
Here's what you'll need: sunday screen cloth, wood furring strips, woods one-half-rounds, galvanized drywall nails, screw eyes, ceiling hooks, rope cleat, and braided nylon cord.
Instructions
- Cut furring strips and half-rounds to six′ lengths.
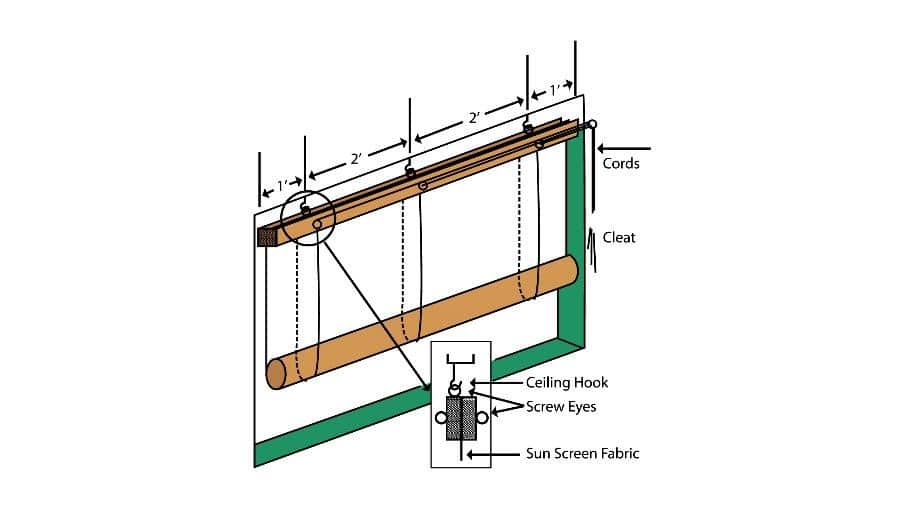
- Sandwich one cut edge of Sun Screen Fabric between the two furring strips and blast the strips together. Repeat with the one-half rounds on the opposite cutting border.
- Insert screw eyes into laths every bit shown on the sketch.
- Tie nylon string to ane screw eye. Laissez passer it under shade and up through contrary spiral eye. Get out sufficient string to pass to side of shade as shown.
- Hang shade from ceiling hooks.
- Locate remaining spiral center to side of top track of shade.
- Place cleat at convenient position to hold cords.
And cheque out our helpful how-to video if you'd like to follow along!
Source: https://jobescompany.com/blog/infographic-sun-screen-fabric-project-ideas-and-instructions/
0 Response to "Cover a Screen Door With Fabric for Garden Art"
Mag-post ng isang Komento